Lazy Girl’s Guide to Photo Styling
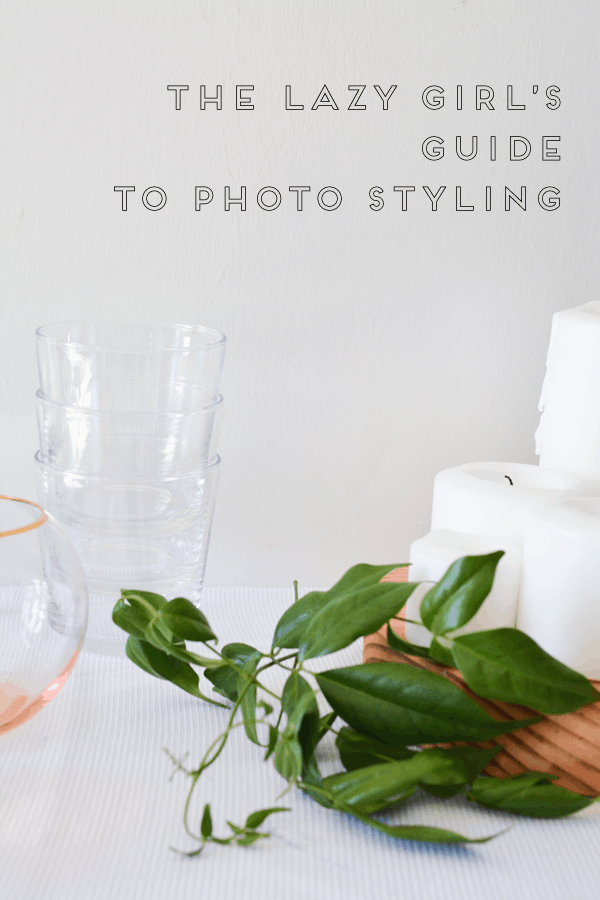 Hey there, hey. In this age of Pinterest, it is really hard to tell if I have actual regular blog readers or if they are just popping by to check out one project they came across while browsing. Bounce rates are through the roof. And if you know what that means, this post is for you. People like to see pretty images and while they may have come over for a specific post, you want your content, when they click over to the home page to see what you are all about, to grab them and make them stick around. Pretty pictures don’t have to be hard to produce.. For some people, styling photos for blog posts comes super naturally. For me, I have a huge hurdle I have to over come. Laziness. Oh and I have two kids and only a handful of hours where I am kidless to get the work done, but more importantly, I’m lazy. Producing a gorgeous series of blog post photos can be a big undertaking. For a really long time, I didn’t put a ton of effort in to it. But over time, I figured out ways to create better, more visually pleasing images, without exerting a ton of energy. Granted, some photo shoots are more grand and take more time and money to put together, put for consistently good content, here are some tips that will save you effort and hopefully give you more Pinterest worthy photos.
 Start with a white background. Any one will do. Even a door. Sure it takes a little bit to work around the frame and handles, but you can get really clean, nice shots and you don’t need to paint your walls or freak out because your house isn’t photo ready. I also have a photo frame, that I’ve strung a large piece of white plastic from, to give me a larger space to work with. I leave it up in an area of my kitchen so that it is ready to go when I need it. But this white door idea is super great when I’m feeling super lazy. Or if my work table, in front of my kitchen backdrop, is too full of stuff I haven’t put away from a previous photo shoot. Lazy. Also, any table will work, including a TV tray. Simply throw a cloth on it and get started. I know some people have bought wood and weathered it themselves to make great faux table looks. I ain’t got time for that. You can also get a large piece of wood and paint it white, like I have in the past (but then you have to store it and lug it around). And you can also use white foam core pieces from the local craft store. Prop it up behind your table and you’ve got an instant white background for a few dollars. Don’t think the big bloggers aren’t doing this. Sure, some of their houses have been featured in magazines. But I promise you that most of them do some sort of photo staging such as this.
 Pretty pretty glassware. Get some. If you are shooting cocktails, pretty glassware will instantly elevate your photo. You don’t have to spend a ton of money and you don’t need to buy more than 1 or 2. You should also frequent thrift stores looking for interesting glassware. Or you can pick up inexpensive glassware, that you can modify yourself, to make a one-of-a-kind look. Also, glassware will fill out your photo frame. If you are shooting a recipe, but want it to look more like an actual dining situation, you can add some glasses in and it will enhance the feel of the photo. Leave them empty, or even just fill them with water. Or wine. Whatever. Also, consider a prop swap with your blogger friends. I don’t want to shoot every single cocktail recipe in the same glass but I also don’t want to buy expensive glasses all the time. Other local bloggers might feel the same way and it would behoove everyone involved to share their prop wealth.
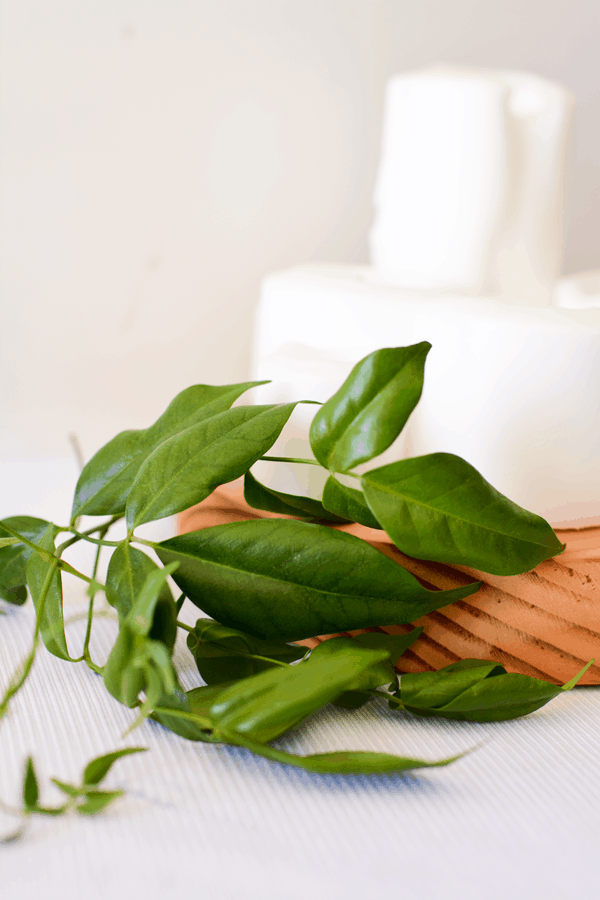 I used to think it was cheating to use fresh flowers or leaves in photo shoots. I would get so bummed out when people would fawn all over someone’s instagram shot and think, you guys! It’s just flowers. I felt like it didn’t really require that much in the way of styling because the flowers did all the work. But people like flowers. And they are super easy to use in photo shoots. So now I use them and/or greenery. It requires less styling and adds SO much. I have stopped buying (when possible due to the season) and go walking around my neighborhood for flowers or branches I can “borrow.” It adds a really great pop of color and a more natural feel to the photos. Something living is always a good boost for a photo (this also includes hands so recruit friends on shoot days when at all possible!). A simple cut flower, next to a cocktail? Boom. Gorgeous photo. Minimal effort. They help to fill in spaces and add another layer to the photo.
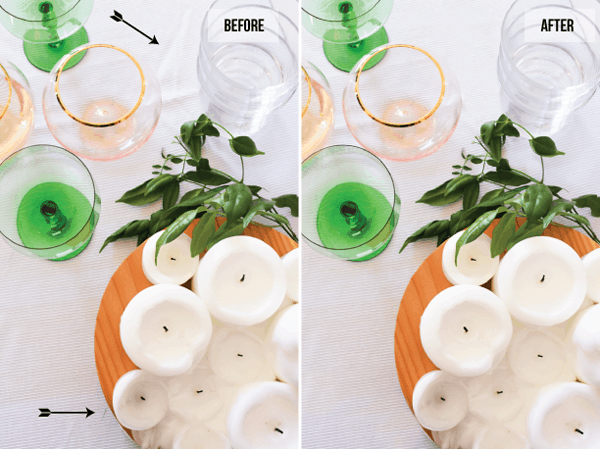 Candles are another thing that are super easy to keep around and add a really nice quality to photos. Just make sure that you have burned them before hand so it comes off as a lifestyle-y “I live by romantic candle light at all times” rather than overly staged. You can use groupings of inexpensive candles like above, or look for really great looking vessels holding a scented candle. Or make your own. Also, there are a few photoshop tips you should know that will help you in your photo shoots. If nothing else, learn the “clone stamp” tool. In the photo on the left, you can see a blue mark and wrinkles. With a few simple clicks, I am able to get rid of both for my finished blog post photo. So instead of going to find another table cover or pulling out the iron, I can take care of those things after the fact. You can also learn to brighten your photos which is ideal when you don’t have awesome natural lighting.
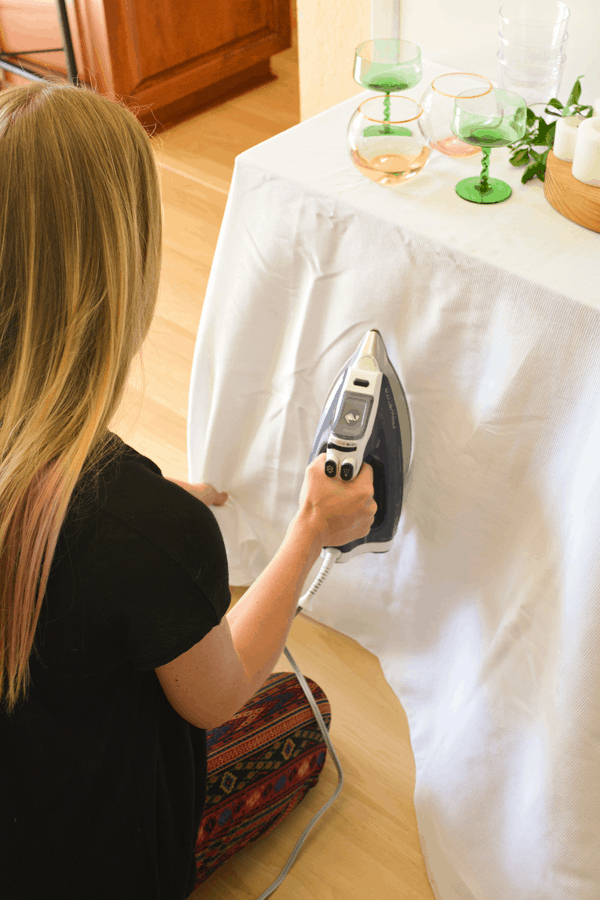 But sometimes you still need to use an iron. A lot of my photos are straight from the front of the table or shooting down from above. But it is always good to get a wide shot, to show the full set up, especially if the focus is on entertaining. This Rowenta iron is crazy awesome and has a vertical steam option so I can get out the wrinkles, while my table is set up, and not miss a beat. And keep in mind that you don’t need to use a tablecloth. You can use anything that gives off the vibe you are after. I’ve used shirts, skirts, towels, blankets, etc. Be creative. And a large piece of muslin fabric is always less expensive than a tablecloth. Grab a few different colors and textures that you can just grab when you start setting up your shot.
I hope these really simple tips will help you to not feel so overwhelmed with photo styling. I hate extra work, but I love traffic. So making a few of these changes might help you increase your traffic as well. It isn’t going to happen overnight, but as you start to develop your look and find your groove, putting a great blog post photo together won’t feel like work at all.
If you are a blogger and you are willing to share your quick photo shoot styling tips, leave them in the comments!
*Iron provided by Rowenta. The Rowenta Pro Master Iron features a precision tip which is awesome for crafters, vertical steaming for use in the upright position on hanging clothes, drapes or tablecloths (works best on hanging fabric with nothing behind it – do not use on the top of a table as the steam might damage the wood). It has variable steam settings and an anti-drip system which prevents spitting and leaking when set on lower temperatures. This is huge! And the iron has a 3-way automatic shut off system that is crazy awesome including shutting off if the iron is knocked over and lays flat for 30 seconds. So you won’t ruin your fabric or burn down your house (probably – this is not a guarantee).
A lot of you probably don’t know this but I spent a lot of my life being an avid ironer (made up word alert). I ironed my full outfit, every single morning, all though high-school and college. And in to my adult years. Even jeans. Even on vacation. Thank you for supporting the brands, like Rowenta, that let you share a little bit more about my loves and quirks with you. A good iron can change your life.
*This post contains affiliate links. Read more about my editorial policies here.
I’m totally guilty of photoshopping in a white brick background in my photos. I don’t live in an industrial apartment. Everyone loves it but I don’t have the heart to tell them it’s fake!
What a great idea!! I don’t think my photoshop skills are as advanced as that!
I had the chance to review the Rowenta too. I loved it. It’s steaming action is great. thanks for the tips.
You’re welcome! I love a good iron!!
Great tips!! I am always on the look out for photo styling shortcuts, thanks for the tip on the “clone stamp” tool, I will definitely check that out. One of my favorite things for photo styling is to pick up 1/2 yard – 1 yard of clearance fabric at Hobby Lobby or similar stores. It’s great to use as a quick table cloth or folded up as a really inexpensive “napkin”
Great idea!! I make “napkins” all the time. :)